Introduction
- Introduce yourself to the patient
- Wash your hands
- Briefly explain to the patient what the examination involves
- Position the patient at 45o
- Assess the patient from the end of the bed
- Check around the bedside for catheter bags (including urine volume and colour) or peritoneal dialysis bags
- Inspect the patient’s skin for any evidence of bruising, uraemia tinge, scratch marks, or vasculitic rashes
- Ensure to comment on any alternative vascular access routes present (e.g. vascath or permcaths)
Always start with the hands and proceed as below unless instructed otherwise; be prepared to be instructed to move on quickly to certain sections by the examiner.
In any renal examination, a major aspect is assessing fluid status and much of the examination is targeted at this; many examiners may want you to state (based on your examination findings) whether the patient is fluid depleted, euvolemic, or fluid overloaded.
The Hands
- Inspect the palmar creases for pallor
- Especially important in anaemia secondary to end stage renal disease
- Assess patient’s skin turgor
- Gently pull lightly upwards on the patients skin overlying the hand or arm
- The rate at which it returns to baseline when released is roughly associated with degree of hydration
- Measure capillary refill time
- Should be less than 2 seconds
- Feel the hands to assess temperature
- Palpate the radial pulse to assess rate and volume
- Check for a flapping tremor
- Can be a sign of uraemia
The Arms
- Ask to check the blood pressure (this may be left to the end of the examination if the examiner deems suitable)
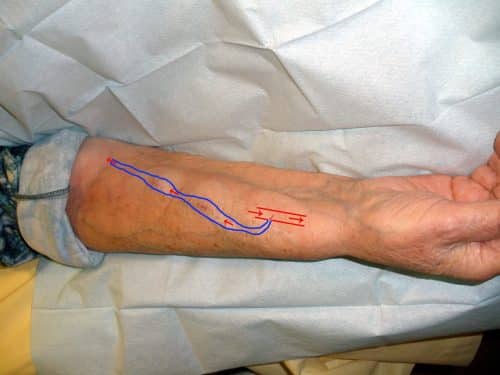
- Assess any arteriovenous fistulae that are present. These can be radio-cephalic, brachio-cephalic, or brachio-basilic.
- Look for signs of recent use (e.g. dressings or needle entry)
- Palpate for thrills (should be continuous) and a pulse (should be soft and easily compressible)
- Elevate the upper limb and assess for its collapse
The Neck and Face
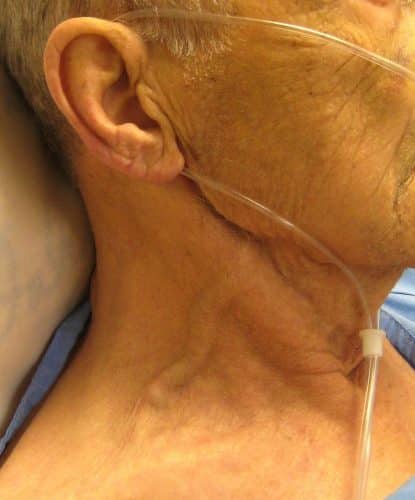
- Assess the jugular venous pressure (JVP)
- Affected by fluid status and contractility of the heart
- Allow patient to relax their head back onto the pillow and turn head to left
- Look between the two heads of the sternocleidomastoid for the double peak of the JVP
- If unsure between carotid pulse and JVP, press gently over the region; if the pulsations disappear, likely to be JVP
- Measure vertically upwards from the sternal angle
- Assess the patients eyes
- Check for corneal arcus or xanthalasma, both signs of hyperlipidaemia (seen in nephrotic syndrome)
- Ask the patient to pull their eyelid down
- Assess for pale conjunctivae (suggests possible anaemia)
- Ask the patient to put their tongue out
- Assess the moistness of the mucous membranes
The Chest and Abdomen
- Auscultate the heart
- Auscultate over the 4 valve areas for stenosis or murmurs
- Mitral regurgitation is more common in patients with polycystic kidney disease
- Listen for a pericardial rub (for potential cases of uraemic pericarditis)
- Auscultate over the 4 valve areas for stenosis or murmurs
- Auscultate the lungs for evidence of any pulmonary oedema
- Palpate for sacral oedema
- Lie the patient flat (if tolerated) and inspect the abdomen for
- Scars
- Nephrectomy scars in the flank or renal transplant scars (e.g. a Rutherford-Morrison scar) in the iliac fossa
- Peritoneal dialysis scars
- Evidence of distension or visible masses
- Scars
- Palpate the abdomen for
- Tenderness in the 9 areas, specifically noting additionally at the renal angle and suprapubically
- Distended bladder
- Ballot the kidneys
- Place one hand under patient’s flank, pressing fingertips of other hand into the same flank from above
- Feel any enlarged kidney between your fingers
- Percuss the abdomen
- Check for evidence of ascites
- If suspected, confirm by examining for shifting dullness
- Auscultate for renal bruits (using the bell of the stethoscope)
- 1cm superior and lateral to the umbilicus
The Legs
- Assess for peripheral oedema over the ankles
- If this is to be properly assessed, one should place one finger in one place for at least 30 seconds
- Feel for any indentation
- If any peripheral oedema is found, move up the leg to assess severity of oedema
Completing the Examination
Remember, if you have forgotten something important, you can go back and complete this.
To finish the examination, stand back from the patient and state to the examiner that to complete your examination, you would like to perform:
- Blood pressure readings (lying and sitting/standing) in both arms
- Digital Rectal Examination (to assess the prostate)
- Urine dipstick
- Fundoscopy (for any evidence diabetic or hypertensive retinopathy)


